Hello guys, if you are looking forward to know as how to Root ZTE Blade V40s without a PC or Laptop you have come to the right place. Rooting your device will essentially grant you elevated permissions. After Rooting ZTE Blade V40s, you will be able to alter or replace system applications and settings, you will be able to run specialized apps that require administrator-level permissions. After rooting perform other operations that are otherwise inaccessible to a normal Android user can be done easily. Besides this you will also be able to access certain “hidden” device features isn’t that great.
ZTE Blade V40s Root – Content
- What is Rooting
- Phone Specs
- Things to do before rooting
- Best 4 Apps to Root
- Pros and Cons of Rooting
- How to check if Rooted or Not
- How to Unroot
What is Rooting?
Rooting basically means allowing users of smartphones, tablets, and other devices running the Android mobile operating system to attain privileged control (known as root access). At its most basic, “rooting” is the process by which one gains access to the administrative commands and functions of an operating system. In simple terms gives you the permission to act like the administrator of the phone – similar to running programs as administrators in Windows.
ZTE Blade V40s Specifications in a nutshell
ZTE Blade V40s sports a 6.67-inch FHD+ display that sits over an AMOLED panel. The display offers 1080 x 2400 pixels resolutions providing a 20:9 aspect ratio and 395 PPI density. Under the hood, the device is equipped with a Unisoc UMS512T T618 SoC chipset coupled with an Octa-core processor, Mali-G52 MP2 GPU, and 6GB of RAM. Phone packs with 128GB of internal storage which can be further expanded.
ZTE Blade V40s is equipped with a triple camera module at the back, which is a 50MP primary camera, 5MP Macro, and 2MP depth sensor camera. While it offers an 8MP primary camera at the front. ZTE Blade V40s boots on MyOS 12 based on the Android 12 operating system. It is well-powered by a 4500 mAh battery that supports 22.5W fast charging.
Things to do before you root ZTE Blade V40s
Please follow the list of instructions and things to do before you begin to root the device
- Perform a full backup of your ZTE Blade V40s
- ZTE Blade V40s should be powered on
- The bootloader of your device must be unlocked
- ZTE Blade V40s should be charged at least 70%
- Enable or Allow installation of apps from unknown sources
- Internet connection necessary (Wi-Fi network suggested)

Best 4 Apps to Root ZTE Blade V40s without Computer
- KingRoot
- FramaRoot
- IRoot
- Vroot
KingRoot
- Download KingRoot Apk
- Install KingRoot Apk on your ZTE Blade V40s
- Click on the start button (You can see a pop message that it will start rooting soon)
- You will see a Success Message once it is done
- Now enjoy your newly rooted device
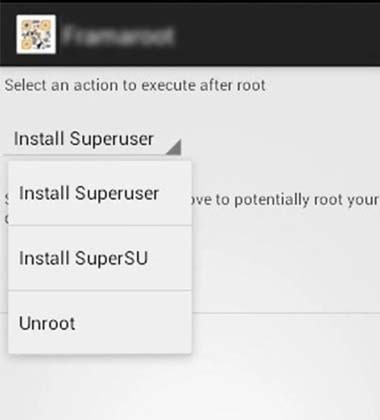
FramaRoot
- Download FramaRoot Apk and install it on your ZTE Blade V40s
- Select the Exploit from the list suitable for your device and click on root. If you are unsure of the exploit compatible with your device, check one by one. It will show you a successful message. It is the one compatible with your device
- ZTE Blade V40s will start rooting
- Now Select SuperSU to install it
- It will install an app in your android phone called as SuperSU which manages all Su permissions to different root apps
- Congratulations, your android phone is rooted successfully
IRoot
- Download the IRoot Apk on your ZTE Blade V40s
- Install it on your smartphone
- Click on Root option
- It will start rooting your smartphone
- That’s it. Your phone has been rooted
VRoot
- Download VRoot Apk on your ZTE Blade V40s
- Install the Apk File
- Tap on Start Button to start rooting process
- After the completion of rooting you need to restart the device. It installs some apps on your phone. You may always continue using them, or you can uninstall them at any time if you wish not to use their help
Pros and Cons of Rooting ZTE Blade V40s
Advantages
- You can increase internal memory of the device
- You can overclock and underclock the CPU and GPU
- You can install those apps which require a phone to be rooted
- You can change themes and their settings as you wish, by changing the battery indicator color, boot icon, and many more
Disadvantages
- It will void your warranty
- The device may get bricked if done any mistake while rooting
- If anything goes wrong you can loose all your precious data and other important files
- Cannot upgrade your system OS to newer versions VIA OTA
How to check if ZTE Blade V40s is Rooted or Not?
You can always check if you are not sure about the rooting as it is done properly or not on your ZTE Blade V40s smartphone. You can use the Root Checker App to check and confirm.
Follow the below mentioned process
- Download the Root Checker App
- Install it on your device
- Open the App, if it asks for permission, grant superuser permission, if not, no problem you can continue to the next step
- If your phone is rooted properly you will get a successful message
- If it is not rooted properly you can go for other rooting options
How to Unroot ZTE Blade V40s easily?
If you don’t want your ZTE Blade V40s to be rooted and want it back to normal you can always do that. You can Unroot your ZTE Blade V40s smartphone with the help of the SuperSU app.
- Download SuperSU App on your ZTE Blade V40s smartphone
- Install SuperSU App
- Open the APP
- Tap on Settings
- Scroll down and tap on Full Unroot option
- Now tap on Continue to continue with unroot process
- Your phone will start unrooting
- After Unrooting, ZTE Blade V40s will automatically restart and it will uninstall all the unwanted apps along with SuperSU.
Disclaimer : This tutorial is for educational purposes only, if anything bad happened to you and your device we will not be held responsible
More Blogs
- How to play GTA 5 on ZTE Blade V40s [Steam Link]
- How to Improve ZTE Blade V40s gaming [Solve Game Lags]
- How to save or increase ZTE Blade V40s battery life
- How to delete or unlink google account from ZTE Blade V40s
- How to Root ZTE Blade V40s without PC or Laptop [Apps]
- [Google Camera] GCam APK for ZTE Blade V40s
- ZTE Blade V40s FAQs – NFC, OIS, USB OTG, Wireless Charging